🏞️ BT-7274
At the start of BT, you only have 4 frags available. You can route more than 4 frag uses into your run per level, but this introduces RNG by relying on enemies to drop frags.
Crash landing
Superglides
At the beginning of the level after the first cutscene, Cooper is without his jumpkit in a state called "grunt movement." This has several effects but importantly it allows the player to perform a tech called a superglide which grants the player instant full sliding speed by pressing crouch and jump at the same time while sprinting. This sequence is one of only two in the game where it can be used. Neat!
Basic route
Frag
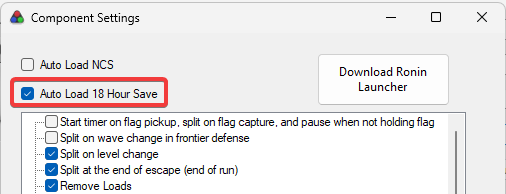
18-hour-cutscene
The infamous 18-hour-cutscene can be bypassed by enabling 'Auto Load 18 Hour Save' in the LiveSplit settings for our autosplitter. It's the only cutscene bypass allowed in Any%.
F1
Start
After the cutscene, there's a segment where cooper is locked to a top ground speed of 7kmh and cannot sprint. However, the player is still able to jump and wallrun, which bypasses this arbitrary speed limit. Because of this, you can grab the wall directly behind cooper after the cutscene and jump off of it to begin a slidehop sequence without needing to wait for cooper to wake up and remember how to use his legs.
Basic route
Crouch Kicks
Frag
Double Wallkick
Basic Route
Double Wallkick
Circle room
Important to both Circle room and double wallkick (with the former being the more important application), wallrunning in Titanfall 2 has a couple of unique mechanics. Namely, the player cannot grab the same wall they've already grabbed unless they are lower than when they first grabbed it. In order to determine whether something is "the same wall" the game does some vector math using the angle of the two walls which works out to an angle of ~24.8 degrees needed between two walls in order for a wall to be considered a different wall.
Circle Room Skip
Circle Room Skip Advanced
Death river
Basic route
Plant strat + Beam bop
Frag
[i know two setups, there might even be more than that -mats]
Prowler Pad
Standard Route
Setup for DMR Clear
If you plan on doing DMR Clear at the end of the level, swap to the r-201 right after Death River and grab the DMR out of either of the weapon containers (the first one is the safer option since the second one contains arc grenades, and getting rid of your frag grenades will mess up many strats and likely make you reset your run if you fail to realize). After this, jump between the two walls on the right side and cfeb after coming around the corner to the next section.
Ship 1
Battery 1 Insert
Slant Boost
Slant Shot
River
River Jump
After inserting the battery, turn towards the piece of ship debris on top of a rock formation, and quickly sprint, slide, and jump towards the "pillar" piece of debris, attempting to wallrun on the exposed, rusted side of it. From here you can either crouch kick off of it, wallkick off of it, or wallrun and jump or cfeb off of it. In any case, slidehop off of the right edge of the panel, hopefully towards one of the higher segments, and then airstrafe and No-Lurch Double Jump to clear the gap (aim for the right side of the hill, as that's where the collision will allow you to get up and potentially keep your speed).
Ravine Setup + Encampment
To get a good Ravine + Encampment transition (the hard strat for Ravine + Encampment) you need to do Ravine Setup first, which consists of doing a frag boost.
If you don't want to do a frag boost here and want do an easier variation just skip over Ravine Setup and continue with the easy or medium strat for Ravine + Encampment.
Ravine Setup
Fragless Ravine
Ravine is actually a pace-locked segment, being constricted to a trigger which only spawns after a specific line of BT Dialogue. (DON'T select dialogue options in ravine, if you're moving even moderately fast it WILL softlock you and end your run because of this). Because of this, many top runners now opt to forgo frag boosts in ravine to ensure they won't move too fast and miss the trigger. Beginning from river jump, if you can keep 40-45km/h post jump, you can either keep this speed through the normal route, or crouch kick off the rock ledge at the right and tapstrafe back to the second platform to end up with ~50km/h. A second crouch kick off the beginning segment of the wall on the second platform can give enough speed to skip the wallrun which joshfrag would normally be used for. After that it's ravine business as usual, crouch kick and shoot the grunt in the way, and then try to build/preserve as much speed as you can into encampment using crouch kicks.
Ravine + Encampment
Basic route
Basic wallruns.
If you've managed to build and keep between 70-80km/h during ravine, you can crouch kick the final wall, strafe to the right and slide off the edge of the rock platform to the right of the underhang. After this, you can slidehop off the side of the "ramp" and go through the vegetation on the right to slidehop and hopefully keep enough speed + height to slidehop off the top of the building in the middle of encampment and tapstrafe around the side of the main building to take a wallkick/ck off the side and proceed to the entry of the second ship (remember to uncrouch or you WILL get crouchlocked and you WILL get angry at yourself for it)
- [I've added many placeholder text tutorials here but some of these strats are likely best explained by video -russ]
- [This is how I would structure Ravine + Encampment but I'm open to critisism -mats]
- [you could also just put ravine setup and the hard strat for ravine + encampment into one tutorial video but idk it's getting late -mats]
Ship 2
Basic route
Battery 2 Insert
Runup
Slant Boost
Enemy Clear
2 Frag Enemy Clear
DMR Strat
Titan Tutorial
Brute Fight
No U
Outro
No Prespeed
Prespeed
Note: Most people don't do this, it's very optional. -mats