🏁 The Gauntlet
Intro
Looking at the blue lights is pretty straight forward. The only thing to note here is that there is a short grace period between when the game lets you look up/down far enough to look at the lights and when the lights become active.
In effect this means that you can chill for looking at the first light and quickly flick to the second light to save frames. Top or bottom first doesn't matter.
Simulation spawn
When starting the level, you gain movement shortly after you hear cooper "land" following the white flash. However, the easiest way to time your movement will be the SRMM Speedometer.
With the exception of wallrun skip, this section can be thought of as an autoscroller. You should still pay some attention to your route and movement, however, as depending on the speed of your progression there are a number of "bad dialogues" you can get from Lastimosa that would otherwise be skipped.
The dialogue cues to pay attention to are:
- You should reach the first wallrun in time so that Lastimosa has not finished the line "...enhanced mobility becomes second nature". Any dialogue starting from the line "beautiful, isn't it?" will lose time.
- The first wallrun doesn't become grabbable until after Lastimosa has finished that line, however. In Mandarin, jump onto the wall as Lastimosa says "... fănyìng yīyàng zìràn".
- When sliding under the rocks, reach the next area quickly enough that Lastimosa does not say the bad dialogue "Under here, stay low".
- Reach from here all the way to the firing range quickly enough that Lastimosa does not say any dialogue past the line "...people like you".
These are just the most ideal scenarios, though, and most bad dialogues will only lose a few seconds to the autoscroller's ceiling. If you're a new runner, don't worry about it too much!
Basic route
Wallrun Skip
To skip a bit more dialogue in this section, you can build enough speed through raw strafing in the first stretch to pass the first wallrun tutorial without actually grabbing it. This saves 2-3 seconds [?] if done optimally.
[video here should cover both wrs and the setup where you just get a good kick on the tutorial wall]
Due to its difficulty, this skip is thought of among most runners as more of a "bonus" than something to actually reset on, so don't get discouraged if you can't consistently get it. You also don't lose any time by attempting and failing it, so I'd say you can feel free to give it a shot at any level. -next racer 1 (one)
Gun range
EPG Grab
You'll typically have a good amount of dialogue time remaining here to grab an EPG from the ceiling wall above you.
Target shooting
Reload Skip
You can skip the reload animation on the rifle if you get to the firing range before the guns drop in, and hold reload before picking it up.
The game requires you to take out all targets while aiming down sights to continue, so you can simply spray down all 5 from left to right with the R201. (A bit of kovaak's might help though)
Transition
Basic route
If you're opting out of the EPG, simply take a kick on the wall to your right out of the firing range and slidehop to the following room. Depending on speed you may also need to avoid the left side of the small connecting corridoor, as Lastimosa teleports there and will have collision even if he hasn't appeared yet.
EPG Transition
If you are using an EPG, you can usually fit in around 3 boosts on your way to the gauntlet. Most optimally you should boost at the same time as each slidehop, either starting from a standstill or from a flick-boost off the kick on the right side wall. Pay attention to your boost trajectories here, as it is very easy to have your EPG run you into one of the obstacles.
Optimizing CK
This is one of the easier strats with the 'hard' label. It's still very easy to mess up, though. So try if it works for you. -mats
Gauntlet
The actual honest to god frfr gauntlet
Basic gauntlet
Frag Gauntlet
On entering the staging area, grab frags from the top right corner of the room. Note that if you pass any other ordanance on your way there, you won't auto-pickup the frags and will have to manually interact with them.
[make sure to include bry's route and the more popular one -mats]
Post Gauntlet
Scoreboard dialogue skip
After you finished your gauntlet run, quickly start another and then cancel it to skip Lastimosa's rambling.
[We should find out how much time it saves -mats]
Go to lastimosa and choose the upper dialogue to move on.

A few seconds later, choose the lower dialogue for less rambling.

Titan Intro
Here you just need to wait for lastimosa to say this line:

Use your Titanfall Button once.
Spamming Titanfall in this section can cause BT to explode which is a huge timeloss.
Ending Cutscene
What follows is a cutscene, so you dont need to do anything until you get to the difficulty options, where you select easy. Ideally you spam Space + Enter to select it the quickest.
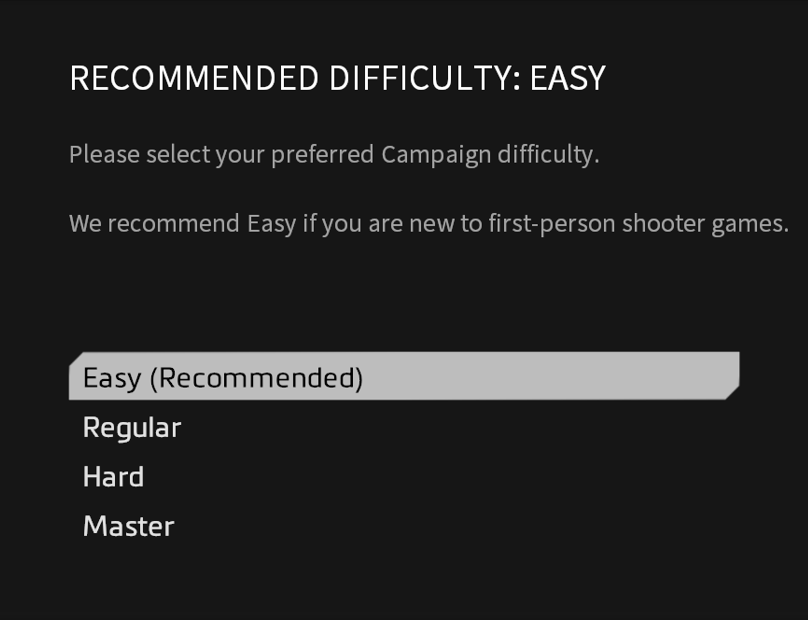
We choose easy because the HP bars on enemy titans and bosses are lower, therefore they die faster. There is also a lower chance of dying, making riskier strats possible.